Litecoin Core on Raspberry Pi 3 Kali
I´m following this post to get running Litecoin Core on my Raspberry Pi 3 with Kali. This howto was created for Raspbian, but it also works in Kali ARM for Raspberry Pi 3
root@kali:~# sudo apt-get install git build-essential libtool autotools-dev auto make pkg-config libssl-dev libevent-dev bsdmainutils libboost-system-dev libboos t-filesystem-dev libboost-chrono-dev libboost-program-options-dev libboost-test- dev libboost-thread-dev libminiupnpc-dev libzmq3-dev jq
root@kali:~# git clone -b 0.15 https://github.com/litecoin-project/litecoin.git
root@kali:~/litecoin# ./autogen.sh
root@kali:~/litecoin# ./configure CXXFLAGS=”–param ggc-min-expand=1 –param ggc-min-heapsize=32768″ –enable-cxx –without-gui –disable-shared –with-pic –enable-upnp-default –disable-wallet
root@kali:~/litecoin# make check
root@kali:~/litecoin# make install
root@kali:~# litecoind -daemon
root@kali:~# vim .litecoin/litecoin.conf
rpcuser = usrlitecoin
rcpassword= pwusrlitecoin
server=1
daemon=1
dbcache=100
maxorphantx=10
maxmempool=50
maxconnections=10
maxuploadtarget=5000
testnet=1
root@kali:~# litecoin-cli stop
root@kali:~# which litecoind
/usr/local/bin/litecoind
root@kali:~# crontab -e
@reboot sleep 8; /usr/local/bin/litecoind
root@kali:~# init 6
root@kali:~# tail -f .litecoin/testnet4/debug.log
Shows daemon log.
root@kali:~# litecoin-cli -rpcuser=usrlitecoin -rpcpassword=pwusrlitecoin getinfo
{
“deprecation-warning”: “WARNING: getinfo is deprecated and will be fully removed in 0.16. Projects should transition to using getblockchaininfo, getnetworkinfo, and getwalletinfo before upgrading to 0.16”,
“version”: 150001,
“protocolversion”: 70015,
“blocks”: 0,
“timeoffset”: 0,
“connections”: 4,
“proxy”: “”,
“difficulty”: 0.000244140625,
“testnet”: true,
“relayfee”: 0.00100000,
“errors”: “”
}
And now, wait for the Blockchain to fully update. This could take hours, may be days..
root@kali:~# litecoin-cli -rpcuser=usrlitecoin -rpcpassword=pwusrlitecoin getinfo
{
“deprecation-warning”: “WARNING: getinfo is deprecated and will be fully removed in 0.16. Projects should transition to using getblockchaininfo, getnetworkinfo, and getwalletinfo before upgrading to 0.16”,
“version”: 150001,
“protocolversion”: 70015,
“blocks”: 4021,
“timeoffset”: -1,
“connections”: 8,
“proxy”: “”,
“difficulty”: 0.0009000699454675865,
“testnet”: true,
“relayfee”: 0.00100000,
“errors”: “”
}
Bitcoin Terminology
After playing for a while with Bitcoin, it´s time to clarify some concepts as: blockchain, wallet, address, mining, …
I will give a non technical definition, just for understand how Bitcoin and Blockchain work.
Hash: a hash is a result of a hash function. Hash functions convert a variable buch of data (video file, text file, MP3 file, etc) into a short fixed length string. If you modify any bit of the data, hash value change. It´s something like a figerprint. Hash Functions.
Address: it is a string witch identifies a source or a destination for transactions. It works as a certificate. You have a public key known by every body to send you money, and a private key, that identifies you as the owner of the address and allow you to operate with it. As the public key is a long string, a hash of the public key is used instead.
Wallet: is a set of addresses. It ´s no recomended to use the same address for more than one trasaction, so a Wallet is a software/ hardware that store all your addresses with their public/private key pairs. Usually, your wallet search in the entire Blockchain and tells you the amount of money that all of your addresses have.
Block: basically is a set of transantions, a “nonce” and a hash.
Blockchain: what make blocks a chain is the fact that every block is related to the previus block. How? The hash of the current block is calculated using the set of transactions not yet added to the chain, a nonce (a number that will be explained later) and the hash of the previous block. That way, any alteration on a block of the chain is discovered due to hashes will change from the alteration to the end of the chain.
Mining: it is the action of calculating the hash of the current block and add it to the blockchain. It sounds easy, but it´s not. To make Blockchain an strong system, hash needs to meet some conditions. The calculated hash has to be minor than a number known by avery mining node. At this point the nonce enters in action. Modifying the 32 bit nonce we have to get a hash minor than the target hash. All this calculations involves a high calculation power, as minor is the target the more power is needed. A minor target means more attempts and more changes of nonce to get the target. As calculation power increases daily, every two weeks the target is reviewed to make it harder. By making mining a hard work, we need a lot of computer resources to be the first finding the target hash, the Blockchain is more secure to attacks. Moreover, as the new added block is distributed to all mining nodes, they can verify the node before it is added to the chain.
Playing with Bitcoin Core Testnet
I´ve decided to learn about Blockchain and Bitcoin on this Christmas holidays.
First step was to download Bitcoin Core Wallet and run a full node from https://bitcoin.org/en/download. It´s easy to run a full node, witch means that you download the entiere blockchain of Bitcoin, but it takes toooo long. So I decided to run Bitcoin Core using the testnet. Tesnet is a parallel Blockchain for testing. In this testing Blockchain you can get Bitcoins for free and play with them.
To run Bitcoin Core in the tesnet, you have to configure your bitcoing.conf file with this parameter:
# Run on the test network instead of the real bitcoin network.
testnet=1
Next time you open Bitcoin Core, it will begin download the tesnet Blockchain. This is smaller than the real one ( 12 GB on December 28, 2017). You will also notice that Bitcoin Core windows is now green.
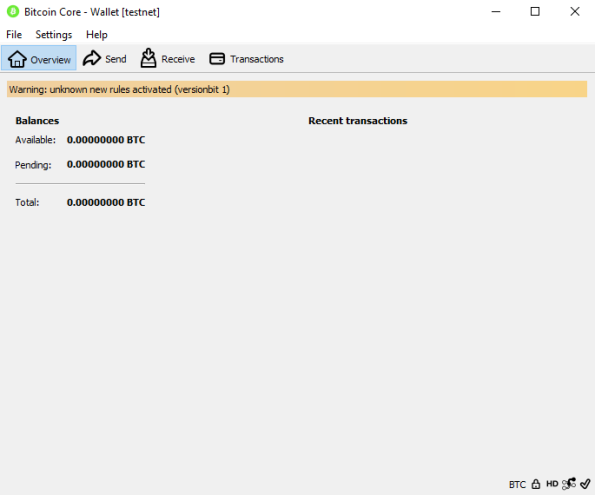
Once it´s up to date. We can play with it. Fist, we will encrypt our wallet by Settings -> Encryp Wallet. This will protect our wallet from been stolen. For Bitcoin Core Wallet, your addresses (public key and private key) are stored into wallet.dat file. This file is what we encrypt. Any one who get this file, will have access to our wallet unless we encrypt it. If you want, you can export your private key to restore your wallet into another wallet software (search Google).
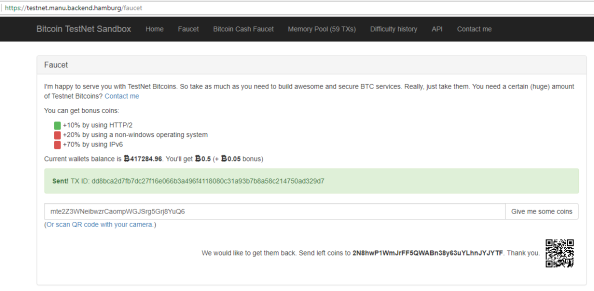
Now, we will get our wallet ID. Receive-> Request Payment -> Copy Address “mte2Z3WNeibwzrCaompWGJSrg5Grj8YuQ6” .
For getting our free Bitcoins for the tesnet, we will visit https://testnet.manu.backend.hamburg/faucet and enter our wallet ID.
Bitcoins are now ready to be available in our wallet. We have to wait to the next block in the Blockchain to be writen (miner) and BTC will be ours.
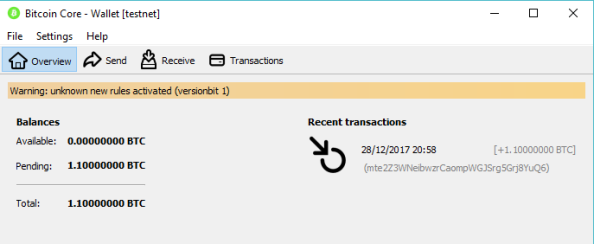
After the new block is mined.

In the next post, I will show you how to make Trasactions with our Bitcoins.
Developing an OCS Inventory Plugin. Track Computers Connection and Location.
I’ve developed an OCS Inventory plugin http://www.ocsinventory-ng.org to track machine connections and location. As I can’t share it from “OcsIventory-ng.org”, I’ve tried, so I’ll do it here. But before the recipe, let’s see the results.

To get the data needed to track computer connections and location, we don’t have to modify OCS Client, all data is already in our OCS server but we have to work with it. In the “hardware” table of our “ocsweb” database, we have that information. Run “select id,lastcome,ipsrc,ipaddr from hardware” and you will see the last connection information for every computer. We just have to save periodically that information into another table to keep tracking.
mysql> describe hardware_conntrack;
+-------------+--------------+------+-----+---------+-------+
| Field       | Type         | Null | Key | Default | Extra |
+-------------+--------------+------+-----+---------+-------+
| HARDWARE_ID | int(11)      | NO   | PRI | NULL    |       |
| LASTCOME    | datetime     | NO   | PRI | NULL    |       |
| IPSRC       | varchar(255) | YES  |     | NULL    |       |
| IPADDR      | varchar(255) | YES  |     | NULL    |       |
| LOCATION    | varchar(255) | YES  |     | unknown |       |
+-------------+--------------+------+-----+---------+-------+
#!/usr/bin/ruby
require 'mysql'
require 'open-uri'
mysql = Mysql.init()
mysql.connect('localhost','root','pwd','ocsweb')
#get all hardware-computers data
results = mysql.query("SELECT id,lastcome,ipaddr,ipsrc from hardware where lastcome is not null;")
results.each do |row|
location = ""
#forming URL to call HostIP.info for Location Data
url = "http://api.hostip.info/get_html.php?ip="+row[3]
#Calling hostip.info API to get data
open(url){|f|
f.each do |line|
location += line
end
}
#Inserting into DB values
results_in = mysql.query("INSERT IGNORE INTO hardware_conntrack () VALUES (" +row[0]+",'"+row[1]+"','"+row[2]+
"','" +row[3]+"','"+location+"');")
end
# Clean DB not to store 3 months old connections track
results_del = mysql.query("DELETE FROM hardware_conntrack WHERE lastcome < DATE_SUB(NOW(),INTERVAL 90 DAY);")
mysql.close()

Now we need to modigy our OCS system to show this new information.
Create the folder “./ocsreports/plugins/computer_detail/hardware_conntrack” where “hardware_conntrack” will be our module name. Notice that the module name is the same than the table name. Create the file “hardware_conntrack.php” in that new directory.
<?php
//====================================================================================
// OCS INVENTORY REPORTS
//
// This code is open source and may be copied and modified as long as the source
// code is always made freely available.
// Please refer to the General Public Licence http://www.gnu.org/ or Licence.txt
//====================================================================================

print_item_header('Connection and Location Track');
$form_name="affich_hardware_conntrack";
$table_name=$form_name;
echo "<form name='".$form_name."' id='".$form_name."' method='POST' action=''>";
$list_fields=array('Last Connection' => 'LASTCOME','Source IP'=>'IPSRC', 'Public IP'=>'IPADDR','Location'=>'LOCATION');
$list_col_cant_del=$list_fields;
$default_fields= $list_fields;
$tab_options['FILTRE']=array('LastCome'=>'LASTCOME');
$queryDetails = "SELECT * FROM hardware_conntrack WHERE (hardware_id=$systemid)";
//$queryDetails = "SELECT * FROM hardware_conntrack WHERE (hardware_id=$systemid) ORDER BY LASTCOME DESC";
tab_req($table_name,$list_fields,$default_fields,$list_col_cant_del,$queryDetails, $form_name,80,$tab_options);
echo "</form>";
?>
Change file permissions and owner
chmod 0755 ./cd_service.php
chown root:www-data ./cd_service.php
Add three icons to the directory “./ocsreports/plugins/computer_detail/img/” and change file permisions and owner as before . The name will be hardware_conntrack.png, for inactive icon, hardware_conntrack_a.png, for active icon, and hardware_conntrack_d.png, for no data collected yet.


Add this lines at the end of the file “./ocsreports/plugins/language/english/english.txt”
6000 Plugins
6001 Connection Tracking
Activate de the plugin adding theses lines to the file “./ocsreports/plugins/computer_detail/cd_config.txt”
<ORDER>
.......
.......
25:cd_hardware_conntrack
</ORDER>

<LBL>
.......
.......
cd_hardware_conntrack:g(6001)
</LBL>

<ISAVAIL>
.......
.......
cd_hardware_conntrack:service
</ISAVAIL>

<URL>
.......
cd_hardware_conntrack:25
.......
</URL>
Please, feel free of improve this pluging and publish it.
Restoring a TSM 6.2 Server on Windows 2008
What we are going to do is restore a Tivoli Storage Manager Server 6.2 that is working in one machine into another new machine. It’s a server change but also can be a disaster recovery.
Since it’s a planned operation, I recommend to install the new TSM Server and test it before the migration. It’s very important to install the same TSM version in the new server and the same TSM Client if it’s installed.
Theses are the steps for a Windows environment.
- Backup TSM BD: $backup db type=full dev=your_dev_class
- Run into TSM: $backup devconfig y $backup volhist
- Run into original server this MS-DOS command:
xcopy "c:\Program Files\TIvoli\Tsm\server1\*.*" "\\nas01\tivoli TSM\ConfigFilesBackup\*.*" /Y /H /C
- Stop TSM Server: $halt.
- Save new server configuration files (volhist.out, dsmserv.opt, devcnfg.out) and replace with the previously copied.
- Update devcnfg.out with the paths of the new server (tsmdlst.exe).
- Run in MSDOS the restore db command with the date parameter. We need the date parameter because we don’t have activelog files to restore the server to the last state.
$dsmserv restore db todate=mm/dd/aaaa
After a while, it depends on DB size and tape speed, you will have the server restored.
Converting from VirtualBox vdi to VMWare vmdk
Converting a virtual disk from VirtualBox to VMWare is now easy. Just type:
vboxmanage clonehd source.vdi destination.vmdk –format VMDK
That’s all.
OpenStak TryStack.org
I’ve just signed up in trystack.org for a free testing acount. I’m ready to enjoy a free OpenStack sandbox.
Good job!!
Installing Request Tracker on Ubuntu 11.10
Las week I installed Request Tracker 4 on Ubuntu Server 11.10 using packages.
Unfortunately the packed version of Request Tracker is 4.0.1 that came with some important bugs in user privileges definition.
If you are planning to instal Request Tracker on Ubuntu, wait for Ubuntu 12.04 that will come with RT packages 4.0.4, or install from source.
Restore VCB Virtual Machine
We use TSM an VMWare Consolitate Backup to backup Virtual Machines from our Virtual Center.
To restore a VM, first of all, restore backup files. After that, import edit vmx file to correct Virtual Disk names. Finally, import VM machine using VMWARE Standalone Converter, not the Converter integrated with Virtual Center.
Updating firmware in a IBM DS4800
This evening I have a plan, but not a Saturday night plan, I have to update our IBM DS4800. That isn’t a hard work, the hard work is to stop everything in the company to do it. You can’t shutdown all the machines as you do with your PC, most of the server have “home made” software that you have to know and an specific plan to shutdown and start-up. Yes, it’s a nightmare.
Wish me good luck.
